Showing posts with label art and craft. Show all posts

Thursday, 14 April 2016

A Family Of Shapes


Yes, it is time to start formal classes with JE and hopefully I will have more posts to share soon. I am starting with the things she has shown more interests in and that would be glue, stickers, masking tape, colours and shapes. Last week, we made a collage of a garden (which I have not found time to write a post about it) but it seems to me that she could not figure/or picture out what we were doing. Well, she knows grass, tree, flowers, sky, cloud, bird and butterfly but she did not show much interest in arranging or pasting the pieces of papers. She was more engrossed in putting glue on them. So this time round, I thought perhaps making a face would help her to learn how to form a picture (or rather, get a picture of what we are making)  because I assumed that she would know where to put the eyes, nose, mouth and hair. Hmmm... 

She was excited the moment she saw me arranging her table and chair to where she would do some work. She was more thrilled when she saw me taking out the bottle of glue. She started putting glue on a piece of yellow paper but after she was done, she just passed the paper to me. Yes, she still hasn't get the purpose of putting on a glue on a piece of paper but that's alright. I asked her where she wanted to put the paper and she pointed at the bottom right of the art block. Then she continued putting glue on the next piece of paper. 

JE putting glue on the yellow triangle. 
After sticking all four shapes, I asked her to pick a shape for each family member. She chose square for Daddy, circle for her big brother, rectangle for Mommy and triangle for herself. 

Next comes the fun part of putting on the eyes, nose, mouth and hair all according to the shape of the face. For the square face, she should stick on square eyes and for the circle face, she should stick on circle eyes and so on. I use labelling stickers which are a lot easier to handle and she could learn to peel them off. It's an important fine motor skill and also fun to do. 


JE peeling a labeling sticker. 

So this is Mommy and Daddy


and this is JS her big brother


and this is JE herself!


When JS came home from school and saw what JE did, he also wanted to make one. This is what he did. 


Wednesday, 2 September 2015

Learning To Tie Shoe Laces With DIY Slippers

This is a long delayed project with the aim of trying to teach JS how to tie a ribbon and also shoelaces. He does not have any shoes with shoelaces yet so it was almost unnecessary to learn this skill but I think he should so I told him that he could have his own sport shoes like Daddy's badminton shoes when he grows a bit older and he could go play badminton with him. 

The activity would not be interesting without something actual to work on so the best thing was to make a footwear for this purpose.

We made a pair of slippers with patterned cardboards, felt stickers and foam sheets. 

The first step was to draw the outline of his feet for the foot soles. 


Next we made the upper part using foam sheets and felt stickers. Then we punched some holes for the string. The string was not really necessary but because this project was aimed at teaching JS how to fix shoe strings and tie a ribbon, it was necessary. If your project was just to make a slipper, you can decorate the upper part in any other way. 


From the picture below you can see that we used felt stickers to stick the upper part on the insole of the slipper. We used felt stickers because it has a stronger hold and is mess free. Next, we put some latex glue at the bottom of the insole to stick the sole on. 


Lastly, JS learnt to tie the string on the slipper. 


Thursday, 7 May 2015

Weather Chart


Here is another long delayed post. JS made this weather chart a few months back. I have been busy organising, scheduling and re-scheduling my time and things-to-do list for a few months now, trying to find the best way I could to juggle housework and the children's needs, thus, neglecting this blog for quiet a while. On top of that, I have been a bit selective on the activities that I prefer to post first. I just noticed that I have not even posted the second part of our Chinese New Year activities. I will try to find the time to write that as soon as I can. I am trying to psycho myself into getting up 1 to 2 hours earlier so that I can get more things done but I am finding it hard to get out of bed when I wake up at around 5am to make JE a bottle of milk. When JE was still an infant, I did not go back to bed after feeding her at 5am and I could get a lot of things done but now, I wonder why I just couldn't do the same. Hmmm... perhaps I am getting old? 

OK. Lets go back to the weather chart. It was very easy to make as we used cut out pictures. The colourful pictures actually made the chart look quiet attractive. We used labelling stickers for words and cut a pointer from a foam sheet. 

I wrote the words "WEATHER CHART" on a piece of paper for JS to refer to as he formed the words on a black mounting board. After that, he arranged and glued four pictures - rainy day, sunny day, cloudy day and windy day on the board. JS used to refer sunny day as "hotty day" (I presume that he figured the term out, in relation to "rainy day"). Until now, he would sometimes prefer to use his own terms. 


Then he placed the labels correctly under each picture. 


Lastly, he fixed the pointer at the centre. 


We hang the chart on the easel that we put near the sliding glass door where JS could check the weather whenever he likes and use the pointer to point at the correct weather. 

One morning, while on the way to school, JS told me that he dislike sunny days because it is too hot. He likes cloudy day or night time when the sun is not shining. Hmmm... he is more like his dad in this aspect. I love sunny day! Cloudy day is nice but if it lasts too long, I feel gloomy. Sunny day makes me happy. What about you? 


Monday, 9 February 2015

Activities for Chinese New Year (part 1)


Chinese New Year is just around the corner and of course, most of our recent activities are related to this occasion. JS does not really understand the meaning of the celebration, which is the ushering of a new year based on the Chinese calendar but he knows some of the things related to it, namely the lion dance and ang pows or red packets (which is money given to children or the younger relatives, siblings or friends who are still not married). 

This year, I planned to introduce to him the Chinese Zodiac and also some delicacies related to the celebration. Here, I would like to share with you the Chinese Zodiac activity we did several weeks ago.

I found some pictures of the Chinese Zodiac (I purposely chose the ones in Chinese paper cutting) online and printed them out for this project. 

First, JS had to cut the pictures of the zodiacs and the Chinese characters out one by one. 

To make the chart, he chose a brown coloured paper, which I thought was a good choice because it goes well with the pink zodiacs. 

Here, he learnt how to find the centre point of a paper and drew a circle with a compass. 

JS folding the paper to find the centre point for his circle chart. 

JS drawing a circle using a compass. 
Then he had to divide the circle into twelve parts for each of the zodiac. 


After that he arranged the pictures and the Chinese characters accordingly on the chart. 


And he learnt that his Chinese zodiac is tiger and his sister's is snake. I am also glad that he remembers his Daddy's is dragon and Mommy's is the same as his sister's. 


Thursday, 13 November 2014

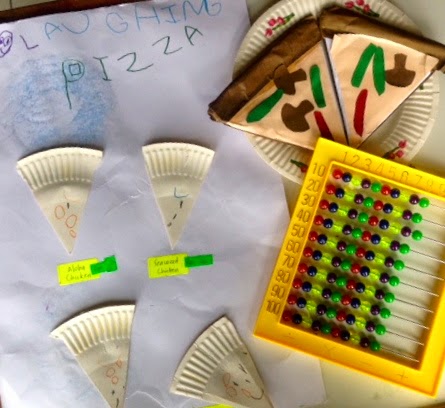
DIY Pizza Menu For Play

This is one of the "one-thing-lead-to-another" project where we were supposed to make crowns using paper plates but ended up making pizzas, and not just that, but a menu that we use for maths now. 

The paper plates that we used were too small for JS' head and thus the crown "broke" when JE pulled it off her brother's head and we decided to make pizzas instead using the triangle pieces. 


After drawing the pizzas, JS made the menu. I suggested several names for his restaurant such as Happy Pizza and Yummy Pizza, just to trigger him to come up with one of his own and he decided to name it "Laughing Pizza". 


Next, we named the types of pizzas. Since Aloha Chicken is almost the only pizza we order, JS is most familiar with this flavour. We made up the rest, namely Seaweed Chicken, Tomato Hotdog and Eggy Prawn. 


Then we moved on to price them and JS priced Aloha Chicken at RM3 each, Seaweed Chicken at RM4 each, Tomato Hotdog at RM10 each and Eggy Prawn at RM5 each. 


We proceeded with some pretend play where JS also learnt addition using lego bricks as money and an abacus to help him add up the prices of two pizzas. 


Tuesday, 4 November 2014

Leaves and Branch Stamping

Here is an activity where we used materials from the nature - parts of a plant, to do stamping. This time, we are making a turkey. 

First, I made JS trace the picture of a turkey using carbon paper. 


Next, we gathered some leaves and soft branches from our garden. 


We used the leaves for the larger feathers. I made him do the leaves stamping on a different piece of paper and then we cut them out and stuck them on the picture accordingly. 


The following day, we used the soft branches to do some stampings for the smaller feathers. 


Here's how the turkey looks like. Well, it isn't that fantastic I kind of like the large feathers. 

Now that it's the month of November, perhaps your children can try this as a Thanksgiving art and craft activity!


Sunday, 21 September 2014

JE's First Foot Printing Experience

JE turned one recently and we had a simple celebration at home on the day before her birthday. The following day, JS and I made something for her. Well, she was also involved in the artwork. I wanted it to be a more meaningful first birthday keepsake so we included her footprints in the work. 

First, JS cut out pictures from the gift wrapper Daddy used to wrap JE's present. It took him a good 40 minutes to cut out enough pictures to make a name collage for his sister. 

Next, JS put a box of poster colour on the floor for JE to choose two colours for her footprints. She chose pink and green. To prevent her clothes from getting smeared by paint, I put her in one of JS' t-shirt which was already smeared with paint.


Then I applied paint on her foot and she had her first foot printing experience.  


After the printing, JS proceeded with the name collage.


Originally, I wanted to make a footprint keepsake for JE on clay dough but due to time constraint, we made this instead. 


Wednesday, 17 September 2014

The Apple Tree


While children from some parts of the world such those in the US and UK are having fun with lots of activities related to apples which is being harvested in autumn, here, in Malaysia, my son and I are using the life cycle of an apple tree to study about the four seasons. I have always wanted to do a four seasons picture with JS but on the other hand, I don't think he is able (yet) to relate the meaning of the seasons since we live in a tropical country. 

Fortunately, we have this book about the life cycle of an apple tree that covers all four seasons. It is one of JS' favourite books to read at the moment. With the names of all four seasons mentioned clearly in the book, alongside pictures that shows obvious changes in the tree, it serves as a perfect material for a four seasons picture.

First, we identified the words - winter, spring, summer and autumn in the book and studied the pictures that showed obvious changes in the tree. 


Then we divide a large piece of art block into four sections and started off with winter. 


 Next, we moved on to spring where flowers started to blossom, followed by summer where the flowers fall off and apples started to grow. 


And finally in autumn the apples are ready to be picked and be enjoyed in various ways such as the delicious apple pie.